
Threads in 3D printing (and how to avoid them)

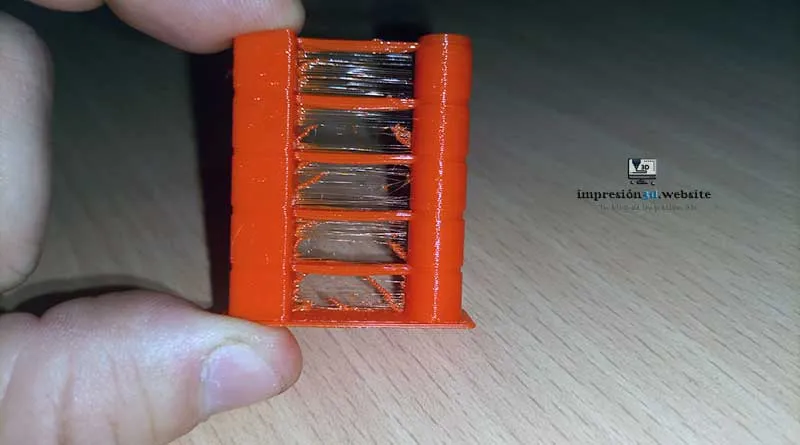
Looking for information on how to eliminate threads in 3D printing, I found that they only talked about the retraction distances and the temperatures of the filaments, leaving aside other important factors.
Today I want to share with you all the ways I found to avoid or eliminate threads in 3D printing.
To completely eliminate the threads in 3D printing you have to master the shrinkage parameters, the melting temperature of the filaments, the speed of translation movements, eliminate moisture in the filaments, have the print bed leveled perfectly and always keep the mouthpiece clean.
What is Stringing
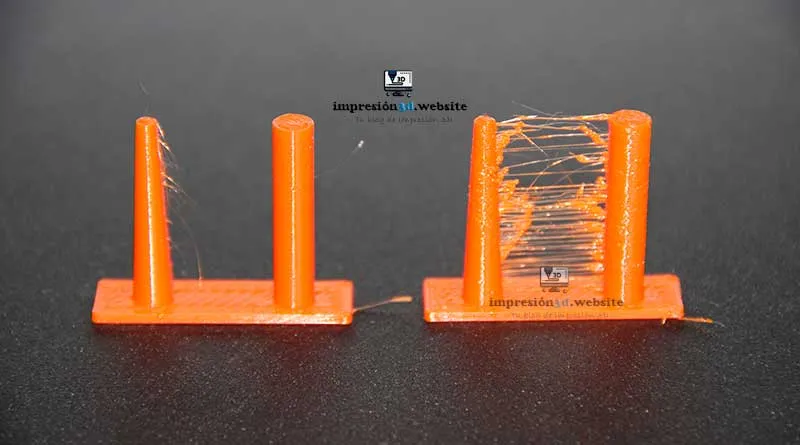
The stringing (or stringing in English) is the formation of plastic threads during the 3D printing process.
These threads leave an unsightly, unprofessional look and require post-processing to manually remove.
These "hairs" in 3D printing are very common and are due to a set of factors that I am going to list and develop below.
How to avoid threads in 3D printing
If your 3D printer leaves many threads in the print it is because you may have moisture in the filaments, the configurations of shrinkage and temperature they may be wrong.
In addition, other factors such as having the dirty mouthpiece and the poorly leveled bed They can favor the formation of threads in your prints.
To avoid threads in 3D printing you must:
- Activate and configure retractions (in treatment).
- Activate Combed Mode (in treatment).
- Set up travel speed (in treatment).
- Activate Cooling (in treatment)
- Set Print Speed (in treatment)
- Choosing the optimal temperature for your filament (in treatment).
- Remove moisture from the filaments.
- Clean the extruder nozzle.
- Correctly level the print bed.
- Check that the bowden tube couplings are not broken.
- Lubricate the bowden tube.
Activate and configure retraction settings
Something very important is to have the retraction settings activated in your favorite Slicer, (in my case it is Cura).
These settings will determine how far and how fast the filament exiting the nozzle will be "retracted" before the extruder moves to another spot on the print bed.
This is important because if it is not activated or set correctly, the nozzle will continue to lose filament when moving between the walls of the print.
What is shrinkage in a 3D printer?
Normally the extruder's Nema motor is in charge of pushing the filament through the bowden tube, which passes through the hot nozzle while the extruder carriage moves, forming the walls of the print.
Retraction in a 3D printer is the movement of the extruder that instead of pushing "retracts the filament back" in order to release the pressure of the filament in the print nozzle.
At the moment that the nozzle must be moved from one point to another, the extruder must stop pushing the filament and retract it back to prevent the filament from continuing to ooze out of the nozzle.
Stopping pushing filament and retracting it should release pressure in the nozzle, thus preventing strings from forming when moving between two points.
How to enable and configure retraction in Cura
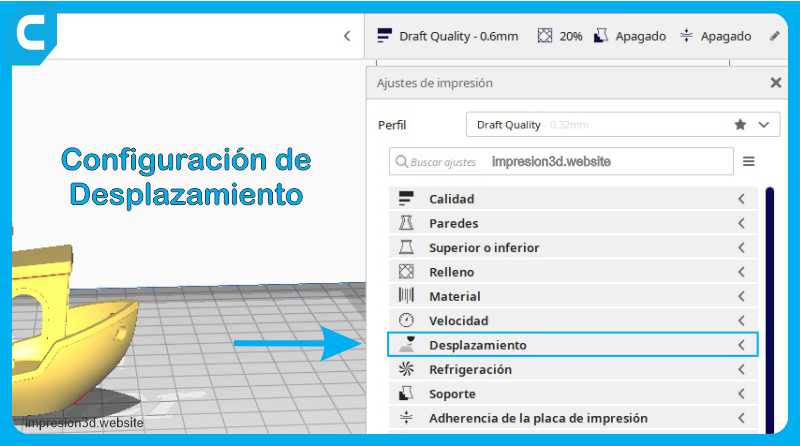
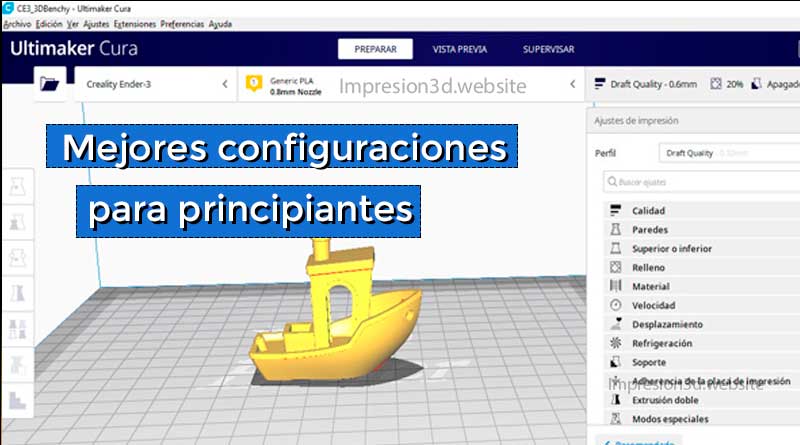
In Cura print settings go to the “Displacement” tab and select "Enable retraction".
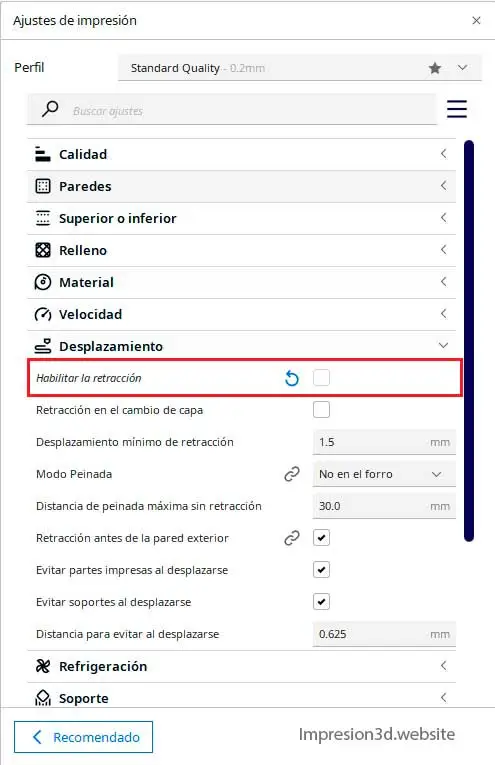
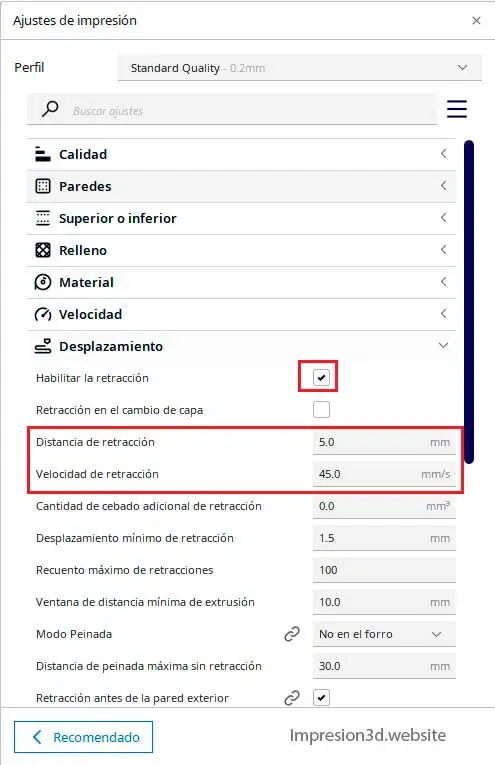
By activating “enable retraction” more options will appear like “Retract Distance” and “Retract Speed”
These options will allow you to set how fast and how far the filament will retract before the extruder carriage moves to another point.
The default settings in cura can vary depending on the 3D printer you have, but in the latest versions of Cura the default settings are pretty spot on.
The default retraction settings in Cura for an Ender 3 are:
- Retraction Distance: 5.0mm
- Retraction speed: 45.0mm/s
I also recommend doing shrink tests to get the best settings for your printer.
The important thing when doing a retraction test is not to modify multiple values at the same time. Modify only one value, for example the retraction distance, and observe the results.
Then when you are satisfied with a value you can leave it fixed and modify another, such as the retraction speed for example.
This would imply printing several tests, until finding the optimal parameters.
How to print a shrink tower
If you already have the “Calibration Shapes” plugin installed in Cura go to menu => Extensions => “Part for calibration” and choose: “Add a retract Tower”
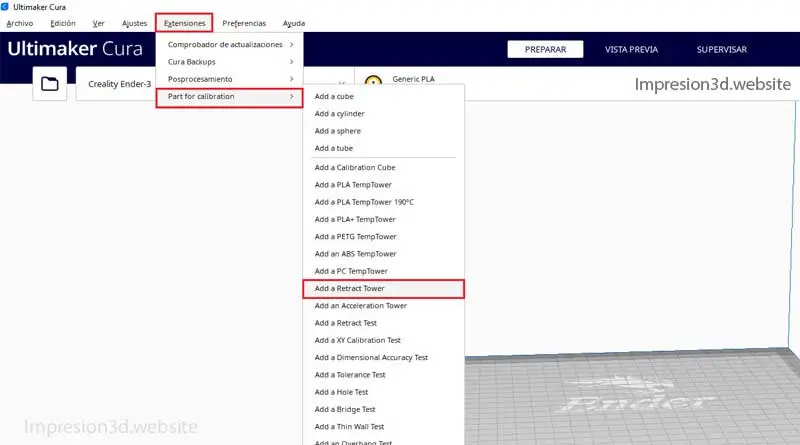
If you do not have it installed you can see how I install it step by step in the publication Temperature tower: Better quality in your 3D prints
Or you can also download one from Thingiverse from Here
Once you have your model in Cura go to menu => Extensions => Post Processing => “Modify Gcode”
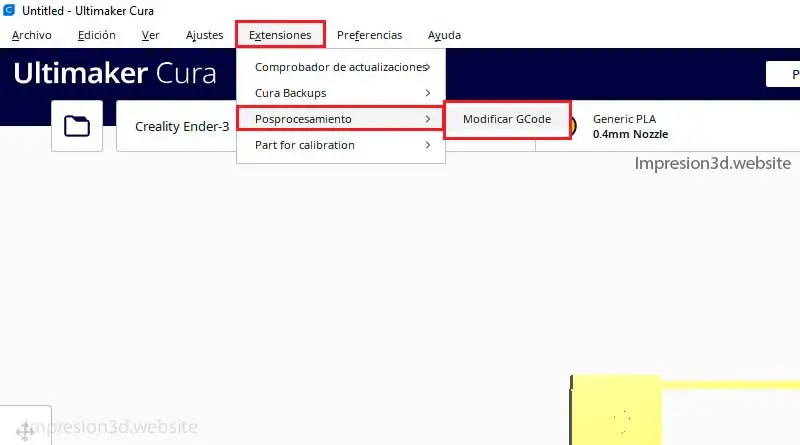
Add a new script, and choose "Retract Tower«
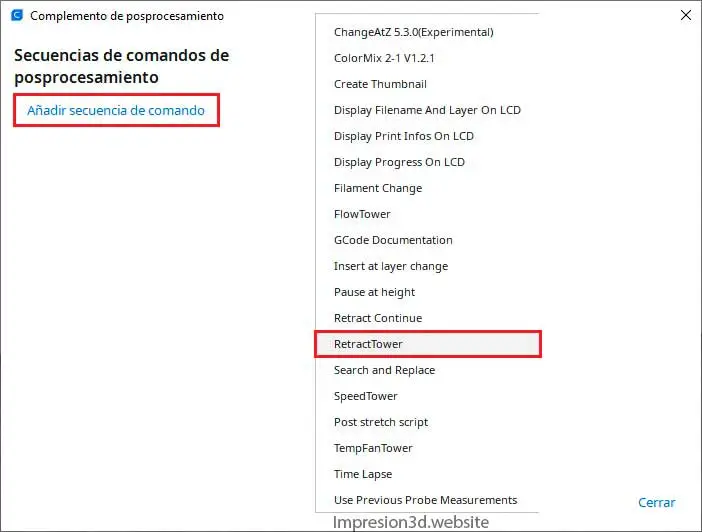
In the right part of the window you will have all the options available for the retraction tower command.
Set Retract Distance
You will have two options, Speed and Distance.
I am going to choose distance for this example and the values will be as follows:
- Command: Distance
- Starting Value: 1 (this value would be the retraction distance 1 mm)
- Value Increment: 1 (This would be the distance value that would be added when going up the section)
- Change layer: 40 (It is the layer in which section 1 changes)
- Change Layer Offset: 4 (These would be the base layers of the model)

Print the shrink tower with the default settings for the type of filament you are using, with a layer height of 0.2mm
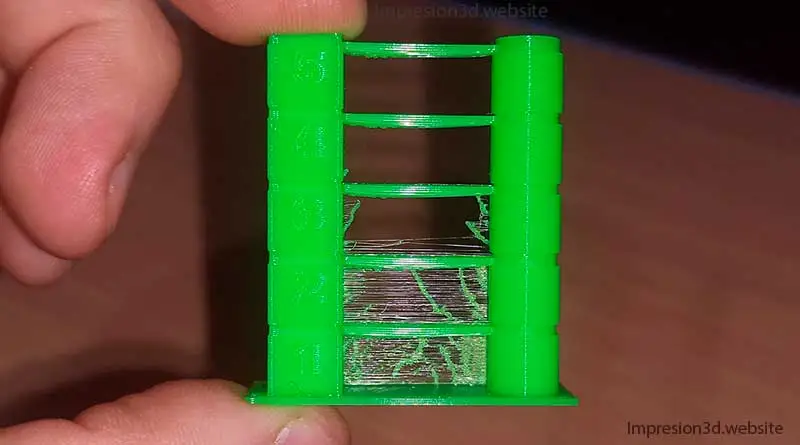
Look at the retraction tower and note in which of the sections there are no threads.
The section with no printed threads will be the best retract distance option for your printer.
Set Retract Speed.
If you want you can also repeat the process but choosing the speed option.
- Command: Speed
- Starting Value: 25.0 (this value would be the retraction speed 25 mm/s for the 1ra section)
- Value Increment: 5.0 (This would be the speed value that would be added when going up per section)
- Change layer: 40 (It is the layer in which section 1 changes)
- Change Layer Offset: 4 (These would be the base layers of the model)
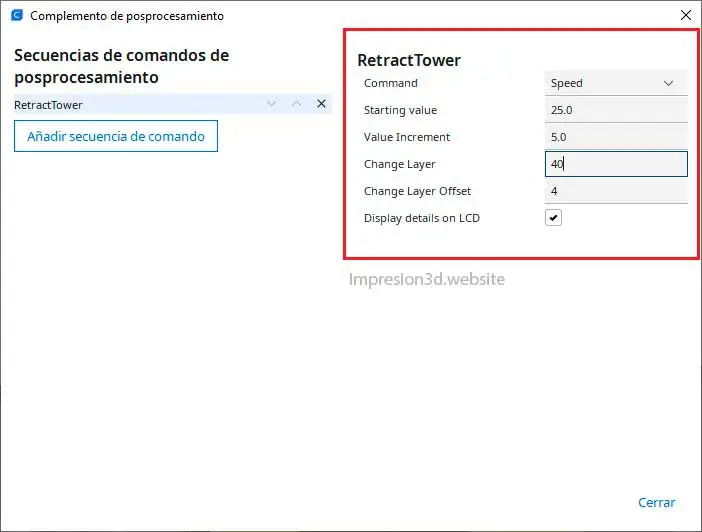
As before, remember that you should not modify any other value. The only values that need to change are those in the script window, don't change anything else for now.
Print the model with the same settings as before and with a layer height of 2mm
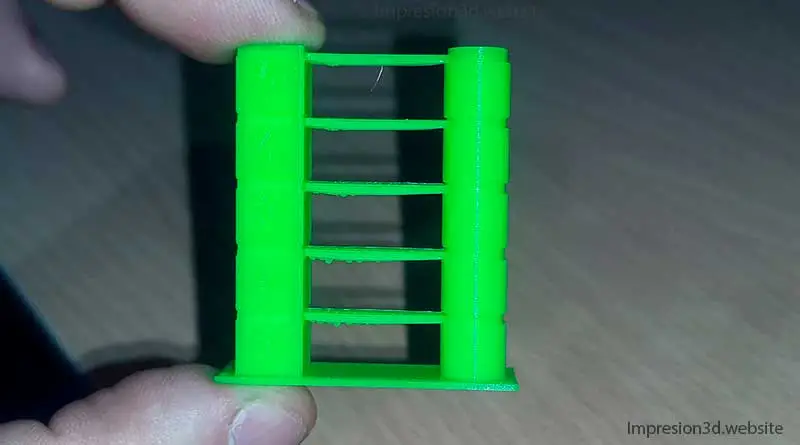
Note which speed gave you the best results and leave that as the default retraction speed.
Activate Hairstyle mode in Cura
A trick that can help you avoid Stringing or threads in 3D printing is the "Styled Mode" in Cura.
Normally, to save time, the Slicer will look for the shortest and fastest way, to move the nozzle in a straight line to the next point.
While this may seem like a good thing (since less print time will be used), it can lead to stringiness in your print.
What is the hairstyle mode
Combing mode is an option in the Cura settings that will direct the nozzle inside the printed areas when moving.
In the event that the nozzle were to ooze filament, the plastic threads would be inside the printed model and not outside.
By activating this option the displacement movements will be slightly longer, but will reduce the need for retractions.
To activate combed mode in Cura go to scroll settings => Combed Mode => “Not on lining”
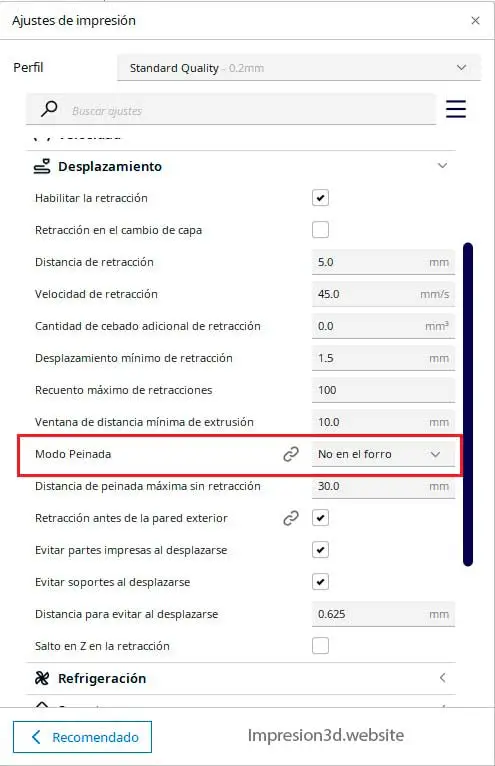
With this option activated you will be able to reduce the chances of leaving Threads in your 3D prints.
Set scroll speed
The travel speed in Cura is the speed with which the nozzle will move from one point to another, when it is not printing.
This speed is important because if the molten filament is low in viscosity it can drip out of the nozzle during the travel of the travel.
To prevent this from happening it is best to set a faster scroll speed.
In Cura these speeds can come by default, but it is still important to check if they are correct.
Make sure you have the printer in good condition, clean with all hex nuts and straps tight, as at high speeds the movements can be a bit jerky.
Set the travel speed in Cura above 120mm/s and up to 150mm/s, this may depend on the type of printer you have and its capabilities.
- Travel speed: 150mm/s
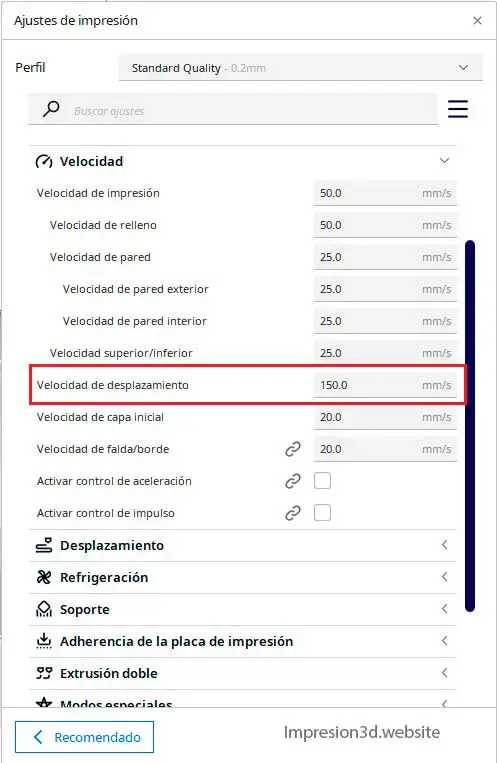
I have my Ender 3 and Ender 3 Pro printers set to 150mm/s travel speed and they work great.
Activate Print Cooling
The layer fans fulfill a very important function at the time of printing, since they are in charge of cooling the filament deposited on the printing plate.
Sometimes it happens that by using different configurations we can forget to activate the cooling, and in the case of some low-viscosity filaments it can be harmful, since threads will be produced in the print.
With some technical filaments recommend turning off the ventilation because there is better adhesion of layers, but this is not a law
If you forget to activate the ventilation with other filaments such as PLA, you will surely have strings.
Try activating cooling for PLA and PETG at 100%
- Enable print cooling: Yes
- Fan speed: 100.0 %
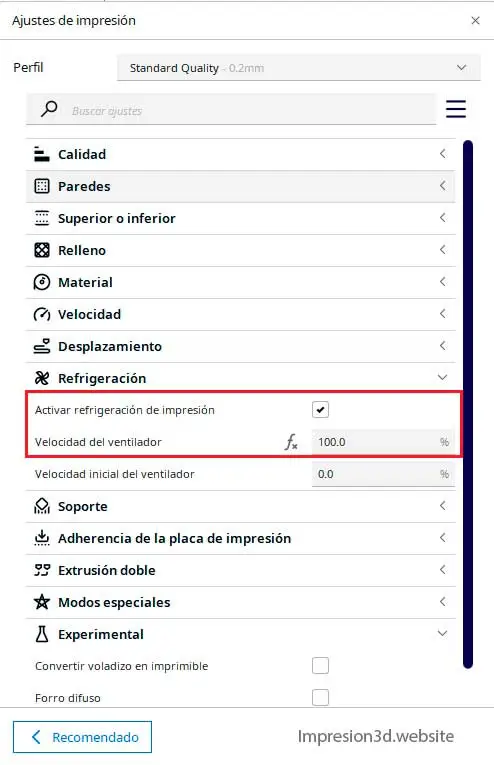
Set Print Speed
The maximum printing speed will depend on each 3D printer, since there are some equipped with slide rails and they are much faster than the others.
In the case of cheap 3D printers like the Ender 3, the most common printing speed is between 50 mm/s and 60 mm/s.
The important thing to note at this point is that the melting temperatures of 3D filaments are directly proportional to print speed.
For example: You can't set a high fusing temperature and use Super Slow print speed.
Imagine using a temperature of 230 °C for a PLA filament and a speed of 10 mm/s for the entire print.
This could not happen because printing at that speed would take a long time and also because the filament would not stop oozing out of the nozzle, leaving a lot of threads.
Find a print speed that you like, are comfortable with, and that your 3D printer can deliver with good quality output.
On an Ender 3 my standard speed is 50mm/s
- Printing speed: 50.0mm/s
- Filling speed: 50.0 mm/s
- Wall speed: 25 mm/s
- Travel speed: 150mm/s
- Initial Layer Speed: 20mm/s
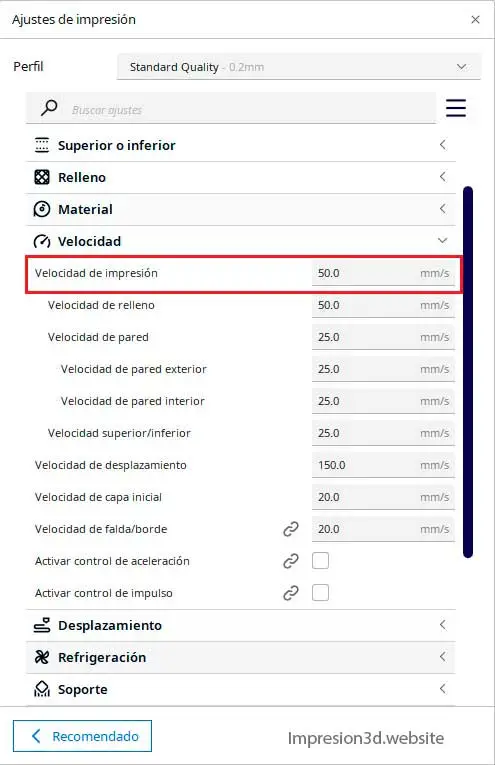
In this example the only exceptions are the first layer and the speed of the walls.
But the general speed is 50 mm/s and the travel speed is 150 mm/s that would be the most important part.
Choosing the optimal temperature
Choosing the best melting temperature for your filaments is one of the most important points of this publication, since is one of the reasons why threads are produced in 3D printing.
Excessive temperature with poor or no cooling can cause the filament to produce many threads in 3D printing.
Do you know what the optimum temperature is for the filament you are using right now?
Most use the manufacturer's recommended temperatures which is fine as they have done the testing and know the limits of their own product.
The issue is that the manufacturer did not do those tests with you printer, that's why provide a temperature range for PLA filament that can go from 190 °C to 230 °C for example.
The important thing is that you know what is the optimal temperature for YOUR printer.
The best way to know what is the best temperature for a 3D filament, be it PLA, PETG, or NYLON is make a temperature tower without a doubt.
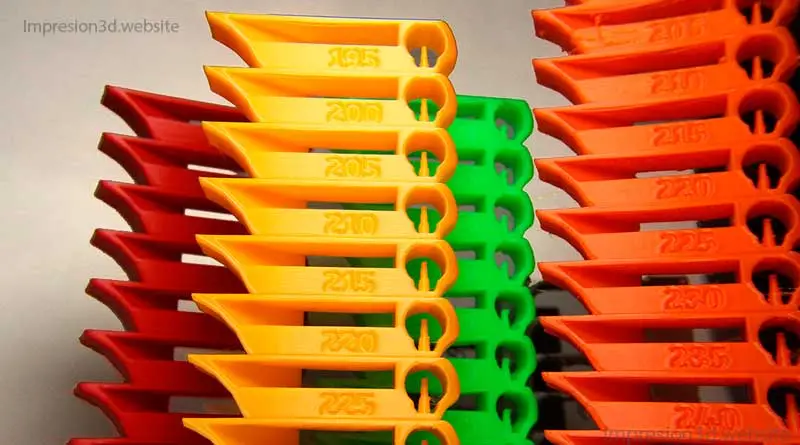
If you don't know how to make a temperature tower, I'll tell you that in this blog I have a dedicated publication, where I show you with pictures how to make a temperature tower and with photos of the examples made by me.
So once you know what is the best melting temperature for your filament with your 3D printer, you should always use it for that filament.
Remove moisture from the filaments
Did you know that filaments have hygroscopic properties? Well, a large percentage of the errors in your impressions are due to it, which means that you should give it importance.
3D printing filaments can absorb moisture from the environment and cause all kinds of errors in your work, including stringing.
When I found out about all the problems that moisture in the filaments could cause, I could understand why I had so many failures in 3D printing.
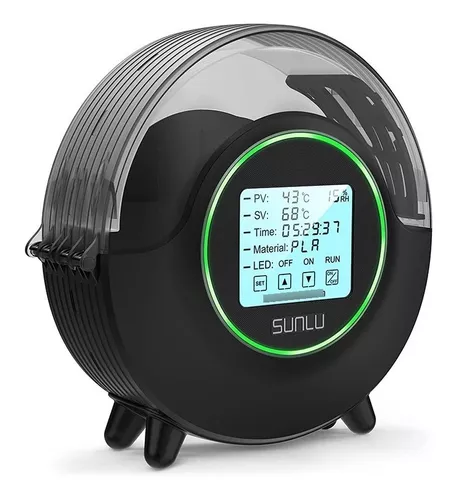
The two most common ways to dry filaments are:
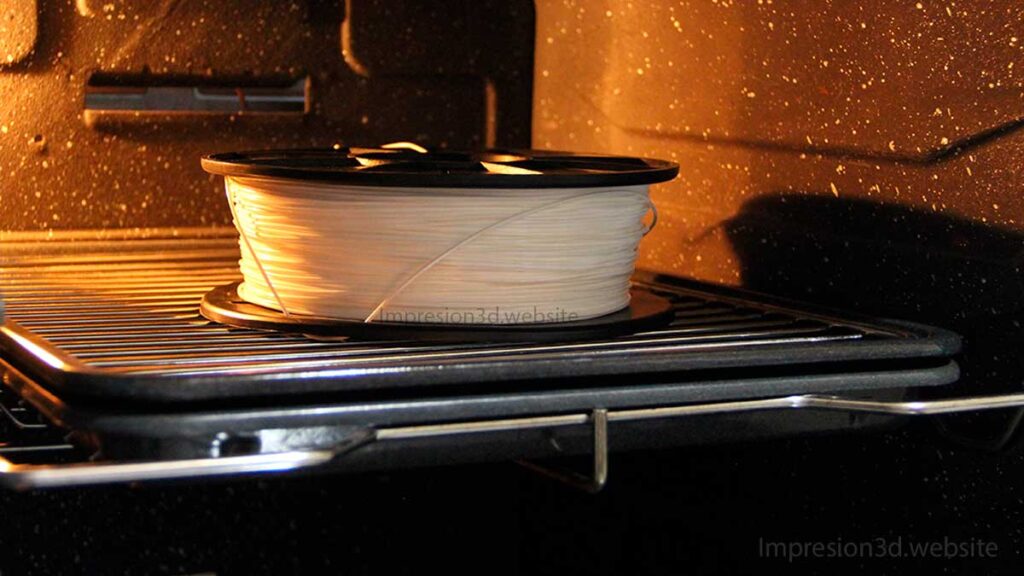
- Dryer box for 3D printing filaments
- Oven.
In the post: Moisture in 3D printing filaments: Main consequences I make a list of the best ways to preserve the filament rolls to prevent them from getting damp.
Once you have removed the moisture from the filaments, the chances of having threads in your prints will be significantly reduced.
I invite you to visit it and take your time to read it, since that publication can fix a BIG part of your 3D printing errors, including stringing or threads in 3D printing.
Clean the extruder nozzle
It doesn't seem like a big deal, (as if having strings in the prints was the fault of having a dirty nozzle, right?) but yes, having a dirty nozzle has a lot to do with it.
Have you ever stared at the nozzle while it is extruding filament? Perhaps during the first coat you have noticed that a ball of molten plastic stuck to the nozzle, has this ever happened to you?
That little plastic ball will move back and forth around the nozzle, sometimes leaving strings in the print (especially with Petg filament) and other times getting stuck to one of the outer walls of your model.
I know that many people do not give importance to the cleanliness of the mouthpiece, but believe me, it does.
And I think so so that I even have a post on all the ways to clean a nozzle.
I personally believe that the best way to keep a clean mouthpiece is not to let it get dirty, that is, cleaning before and after using the printer.
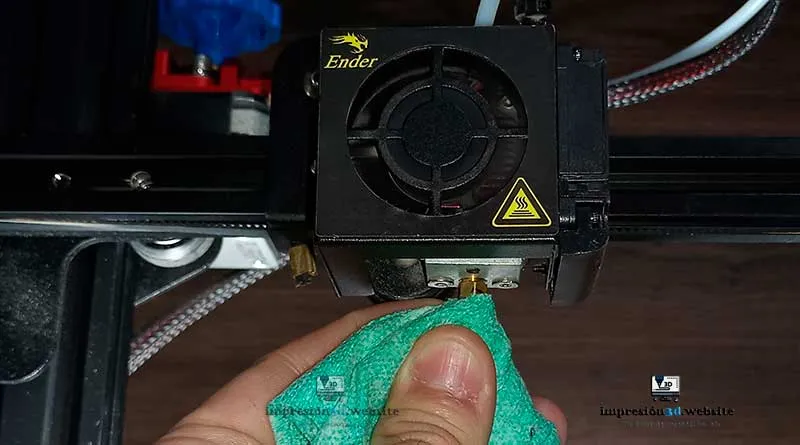
As easy as taking a small cloth or paper napkin (being very careful not to burn yourself) and cleaning the nozzle before and after printing your model.
I know it doesn't sound like much, but believe me having a clean printer nozzle can make all the difference.
Correctly level the print bed
For some, leveling the print bed can be easy, but for others it can be a little more difficult, since they do not fully understand how far the nozzle should be from the build plate.
The reason I put this item on the list is because a nozzle that is too close can cause excess plastic to be deposited on the print bed, as if it were a burr that comes out in the first layer.
If the nozzle is even closer and the speed of the first layer is slow, it can happen that this filament begins to "escape" through the nozzle, also generating that little plastic ball that I was talking about above.
The goal then would be to learn level the bed perfectly, so that there is no excess filament escaping from the nozzle forming plastic balls.
Correctly leveling the print bed is vital, as it the success of your prints will depend on the first layer.
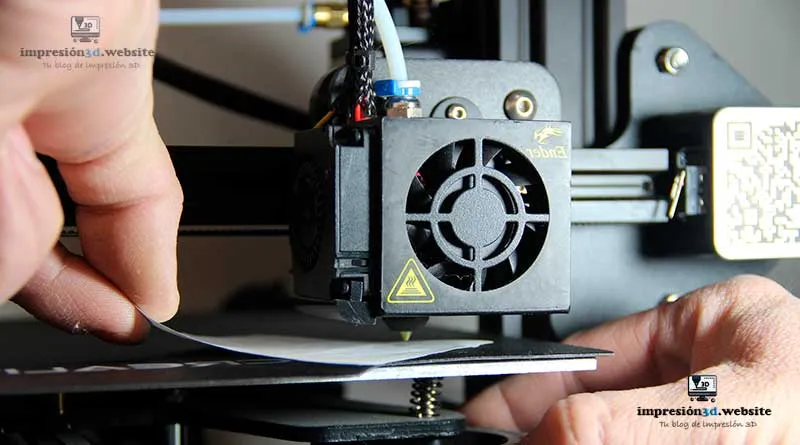
Here is a link to a post about how to correctly level the print bed, using as examples an ender 3 and an ender 3 pro.
Check bowden tube connectors
And it is that although it may not seem like it, a failure can have multiple origins.
A very common failure that can favor the appearance of threads in the prints is the breakage of the couplings that fix the bowden tube to the extruder and the Hotend.
The couplings or pneumatic connectors for 3D printers can break and for this reason the bowden tube can give way, moving from one side to the other.
This failure can cause the retracts to not work correctly and filament to continue to ooze out of the nozzle.
In addition to forming threads, a broken pneumatic connector can cause other types of failures during printing.
In the event of a complete disengagement, the Hotend would continue to print in the air, as the extruder would not be able to push the filament through the bowden tube.
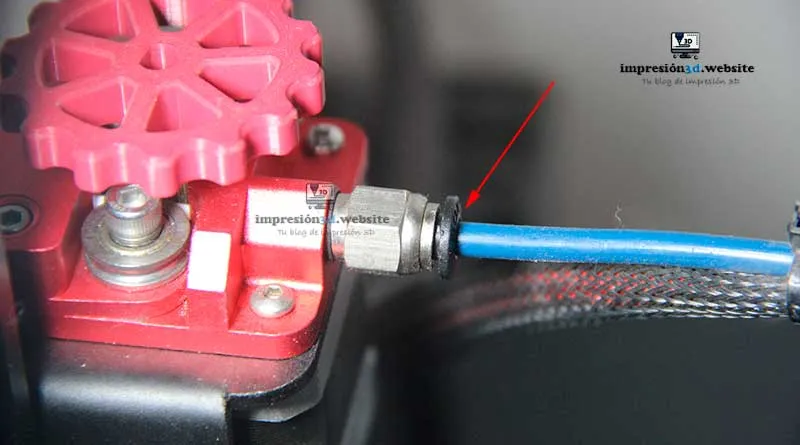
In the post «filament does not come out of the extruder» I will tell you a little more about this topic.
Make sure the printer's pneumatic connectors (the ones that connect the bowden tube) are working properly and the ends of the tube aren't “popping out” or moving around.
Lubricate the Bowden tube
When you have already done all of the above and you still have threads in the prints, there is a trick that can help you out of trouble.
Imagine that you already did all of the above, dry filaments, printer level, clean or new nozzle, tight or new connectors, retractions and other Cura adjustments correctly configured and still you still have threads in your prints.
You only have one option left and that is lubricate bowden tube.
I think that having all of the above done it is very difficult to have threads or strings with the PLA filament, but the problem seems to me that it can come when using PETG filament, since due to its composition it is more prone to forming threads.
When you already have to lubricate the Bowden tube, it may be a warning that you should probably change it, or perhaps trim the burned part that rests on the mouthpiece. Anyway this trick will work if you need to get out of trouble.
Let's see how to lubricate the Bowden tube:
Step 1:
Download and print a filament cleaner from Thingiverse, if you already have it you can skip this step.
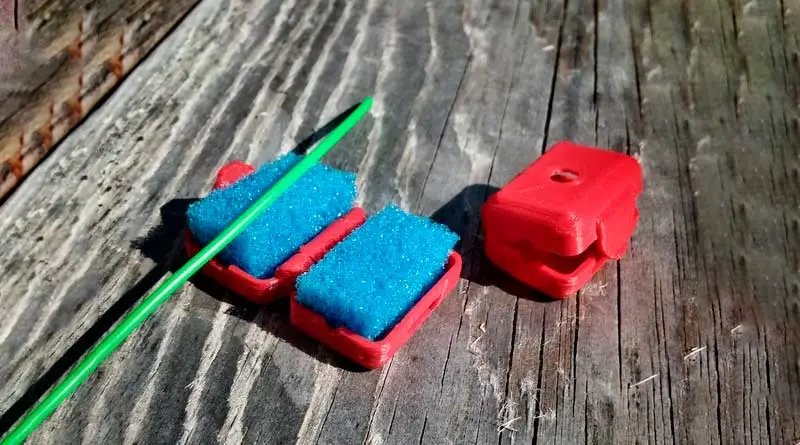
Step 2:
Find a sponge and cut it to the correct size to fit into the cleaner you printed on.
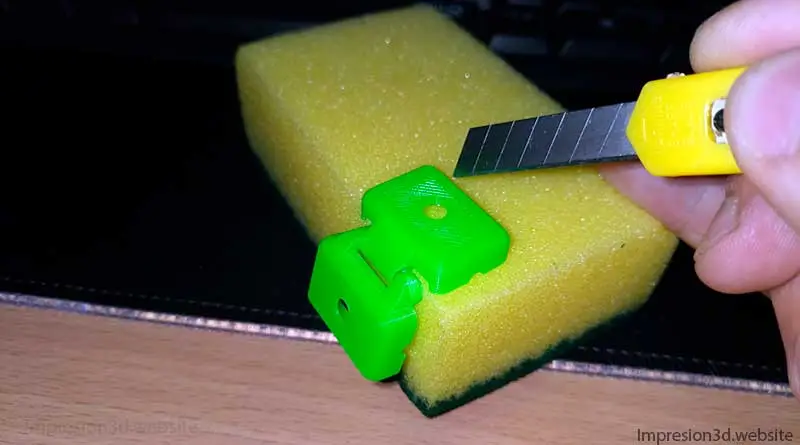
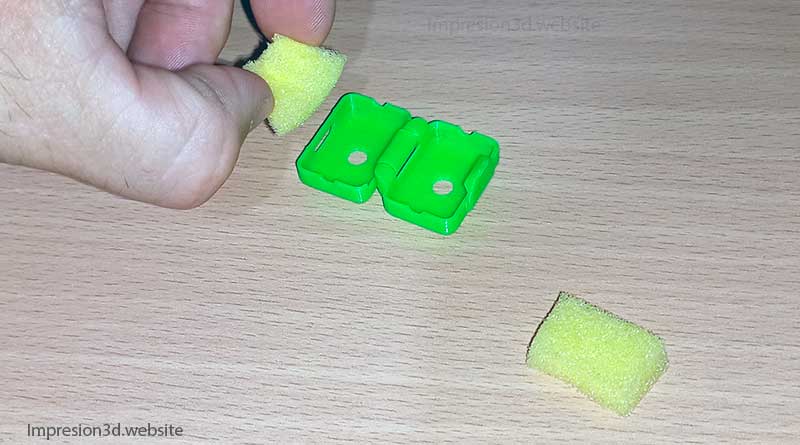
Step 3:
Moisten the sponges with olive oil, just a couple of drops on each side will suffice.
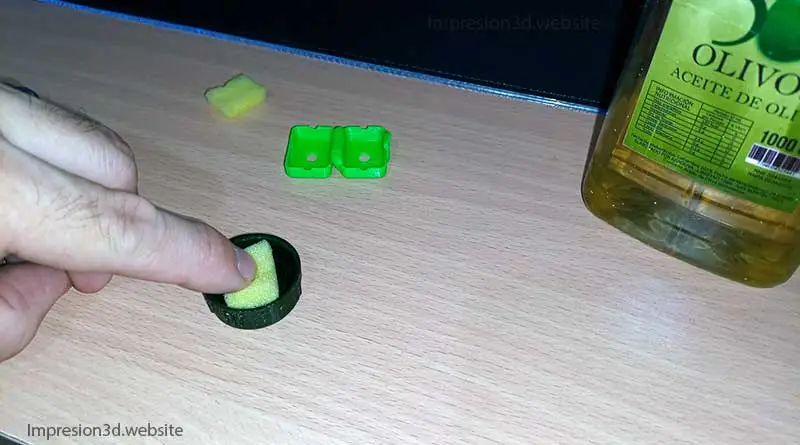
Step 4:
Put the cleaner on the filament before entering the extruder
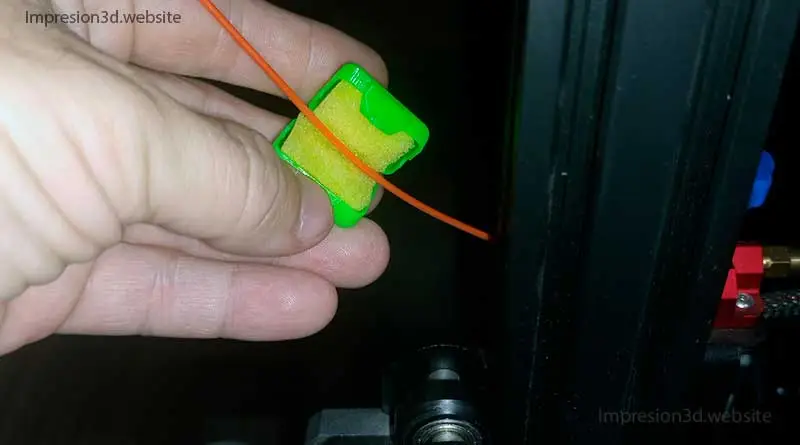
step 5
Heat the nozzle and extrude 100mm of filament
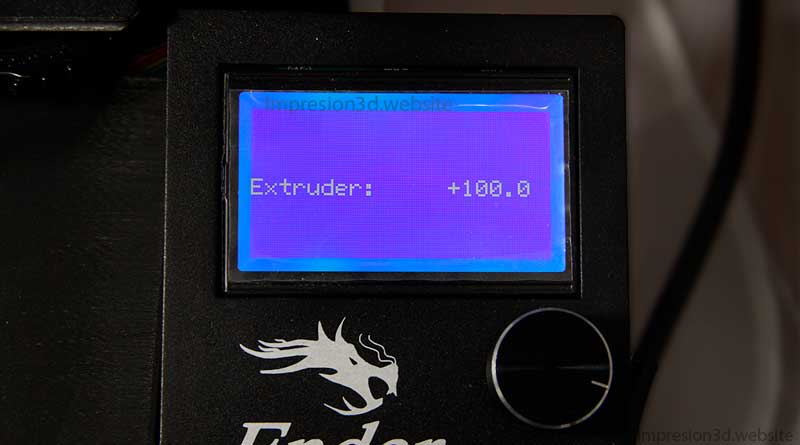
Step 6:
After extruding 100mm of filament remove the cleaner with the sponges and print a shrink test.
When you already have the retraction test, make a comparison to see if all your effort has been of any use.
YouTube channel: CHEP (Activate subtitles)
Last conclusions
I think that the problems that cause the stringing or threads in the prints can be classified into three parts: Mechanical (own of the printer), Software (own of the laminator) and those of the environment (Humidity in the filaments).
So there is not just one reason why the threads occur, but rather there are several, and range from laminator adjustments to printer maintenance and proper filament storage.
While not all printers are the same (some with bowden tube and some with direct extrusion) the tests that I have mentioned in this publication are suitable for all of them:
- temperature tower
- Tower for retraction distance.
- Tower for Retraction Speed.
- Test for retraction test
I leave as a summary a list with all the problems and solutions.
Problem List:
- The threads in 3D printing are formed due to a printing temperature too high.
- The incorrect retractions they can favor the appearance of threads in 3D printing.
- Incorrect settings in Cura, such as cooling and speed can generate threads in the prints.
- The Moisture absorbed by the filaments can generate threads and other printing problems.
- The dirty nozzles they gather molten filament that breaks off and forms threads in 3D printing.
- A nozzle too close to the bed Printing can collect molten filament in the nozzle and form threads.
- Bowden tube can be detached or slipping off pneumatic connectors causing problems, including Wires.
- The part of the Bowden tube that rests on the mouthpiece it can burn and cause problems.
solution list in order of importance:
1- Humidity:
Remove Moisture From Your Filaments: If your 3D printer is leaving strings and your filament is not brand new, then the first thing you should do is dry your filament and find a way to store it so it doesn't absorb any more moisture.
2- Temperature:
Find the perfect temperature: You should not follow any other steps until you know what the right temperature is for the type of filament you are using. Print a temperature tower and choose the best one to always use with that filament.
3- Level the bed:
Look for perfection: No matter what you do, if your print bed is not perfectly level you will not get very far, the success of all your prints depends on this step.
4- Clean the Nozzle:
Clean the Nozzle before and after printing: It is very common to forget about the nozzle, everyone always worries about cleaning the print bed to have a better adhesion, but they forget about the nozzle.
5- Pneumatic Connectors:
It goes unnoticed, it's something that happens and you won't notice unless you look at the bowden tube couplings. Does the tube slip out of the couplings, move from one side to the other?
If so, replace the connectors with new ones.
6- Burnt Bowden tube:
Another common failure is that the tip of the bowden tube burns in the part that supports the mouthpiece.. This can generate all kinds of failures, being the sub extrusion the most recurrent in printers such as ender 3.
Cut the burned part or change the Bowden tube for a new and better quality one.
7- Cure Settings:
Set the retractions correctly, activate the combed mode (the option: Not in the lining), use the temperature chosen in point 2, activate the cooling (layer fans) and use a correct travel speed.
Related Posts:
If you missed it above, I leave you a list with the publications that I mentioned throughout the article.
Be sure to visit them because they can be of great help to you.
1- Moisture in 3D printing filaments: Main consequences
2- Temperature tower: Better quality in your prints 3D.
3- How to Properly Level Your 3D Printer Bed
4- How to clean the nozzle of the 3D printer (All options).
Responses